BLOGGER TEMPLATES AND TWITTER BACKGROUNDS

Tuesday, November 16, 2010

Too Faced Retractable Kabuki Brush

Talk about a new level of soft!  This face brush is a new favorite of mine, although it will never completely replace my old favorite (Sephora's #54 retractable face brush).  The one thing that lacked with the Sephora brush was that the cap kept falling off in my purse for some reason, so face powder got all over, and this made me very sad.

Tired of this one aspect, I shopped all over for a retractable face brush that met my standards for softness and at the same time delivered the powder the way the old face brush did.  This is when I met Too Faced's retractable kabuki brush.  First of all, I don't know why but I was instantly attracted to the fact that it was retractable (this means it took up less space in my purse), and also, it was mega, mega soft.  They call it "teddy bear hair" and I can really see why. 

Another big plus for me was that it was PINK, and as with anything else in the world, it's always a zillion times better if it's pink.  Gosh, it was pretty, it was soft, it really blended my powder well, and it took up less space in my purse.  What else could a girl ask for out of a face brush??  Listen, if you go out shopping on a budget, put this at the top of your list!  


Love,
Geneys  :o)

Wednesday, September 8, 2010

Another Small Giveaway (Closed)

Hey Guys and Gals,

Sorry I've been MIA for soo long.  I think the last post I did was in July or something?  Anyway, I am hoping to get back into the blog groove now, and I am kicking off this resolution with a small giveaway, woot!  

I have been working on creating new and different pieces, and I decided it is time for 'out with the old and on with the new.'  Therefore, I will be giving away the following jewelry piece:


If you would like to have this pair of earrings, FREE FREE FREE, here is how to enter:

1.  You must enter between September 8 - September 23 (11:59pm).
2.  You must be a follower.  And please do not create multiple accounts to enter more times, this is sooo not fair to the others. 
3.  You must leave a comment on THIS specific post stating that you would like to be entered in the drawing for the giveaway.  Please leave only ONE comment; spamming comments is not just annoying, it will also disqualify you.  And note: I must first approve your comments, so if you don't see your comment appear right away, give me some time to get to my email, ya?
4.  And by the way, you may enter for the giveaway even if you live in another country.

Thanks for your participation and following my blog!

Love,
Geneys  :o)

Sunday, July 11, 2010

Available Earrings

Hey Everybody!

I decided to post my jewelry pieces on my makeup blog because well, it takes too much time and effort to make another blog (please see below). Sorry for the inconvenience, but that's how things panned out here.

A word about my jewelry: all of my jewelry pieces are hand crafted and I create each with the best materials. Any silver components you see are sterling and any crystal parts you see are swarovski.

Unless noted as otherwise, my jewelry pieces are one of a kind. Each piece is meaningful and special to me. Once you have ordered, please wait 1-2 weeks for the product to ship.

I really appreciate your visit and if there are any requests you would like to make, or you would like to order a piece, you can email me at geneys@gmail.com.

Love,
Geneys :o)

GEMS BY GENEYS

Complement Earrings


 $30 *Sold*

Violet Foil, Swarovski Bicone, Swarovski Hearts, and Hematite


Hope Earrings


$25 *Sold*

Pink Pearls and Sterling Silver Hope Charms


Love Earrings


$25 *Sold*

Pink Pearls and Sterling Silver Love Charms


Joy Earrings


$25 *Sold*

Green Pearls and Sterling Silver Joy Charms


Fantastical Earrings


$30 *Sold*

Yellow/Green AB and Unicorn Charms


Cat's Eye Earrings


$30

Violet Cat's Eye Beads and Swarovski Heart Charms


Mystical Earrings


$35 *Sold*

Large Silver Pearls and Large Swarovski Heart Charms


Sunday, July 4, 2010

IMATS

You know what?  I went to IMATS and it was awesome!!!  How freakin' cool!!  It wasn't just for people who do everyday makeup, it was also for full-on costume makeup people.  There were people with limbs and eyeballs coming out of places they shouldn't be, just walking around.  And since it was mostly women at the event, there was some eye candy sprinkled everywhere (RIPPED men, half naked).  

Oh man, my sister and I had a ball!  Everything was 40-50% off, and there were makeup possibilities I hadn't even dreamed of.  Below are some pictures from IMATS.  If you guys have a chance to make it to an IMATS, you should GO.  Hope these pictures shed some light on what it's like... 


Haha, me, putting on a weird smirk about my purchases from NYX.

Me, with some cool makeup people.


Thanks for visiting!

Love,
Geneys  :o)

Tuesday, June 1, 2010

Geneys' Gems...

Hey All,

So sorry I haven't posted in such a long time.  I would go through the usual list of excuses, but let's just get to the nitty gritty of it all!  Lately, I have been making jewelry and my sister said instead of giving them away, why not put them up for sale?  I am still considering this major step, but for now, below is a link to a sample of the pieces I have made.  I hope you like them, and please give me any helpful suggestions for future pieces.  Thanks, and I hope you all had a great Memorial Day weekend!

http://www.facebook.com/album.php?aid=179350&id=569417187&l=98051d6d7a

Love,
Geneys  :o)

Sunday, April 11, 2010

Another Collective Haul

Hey All,

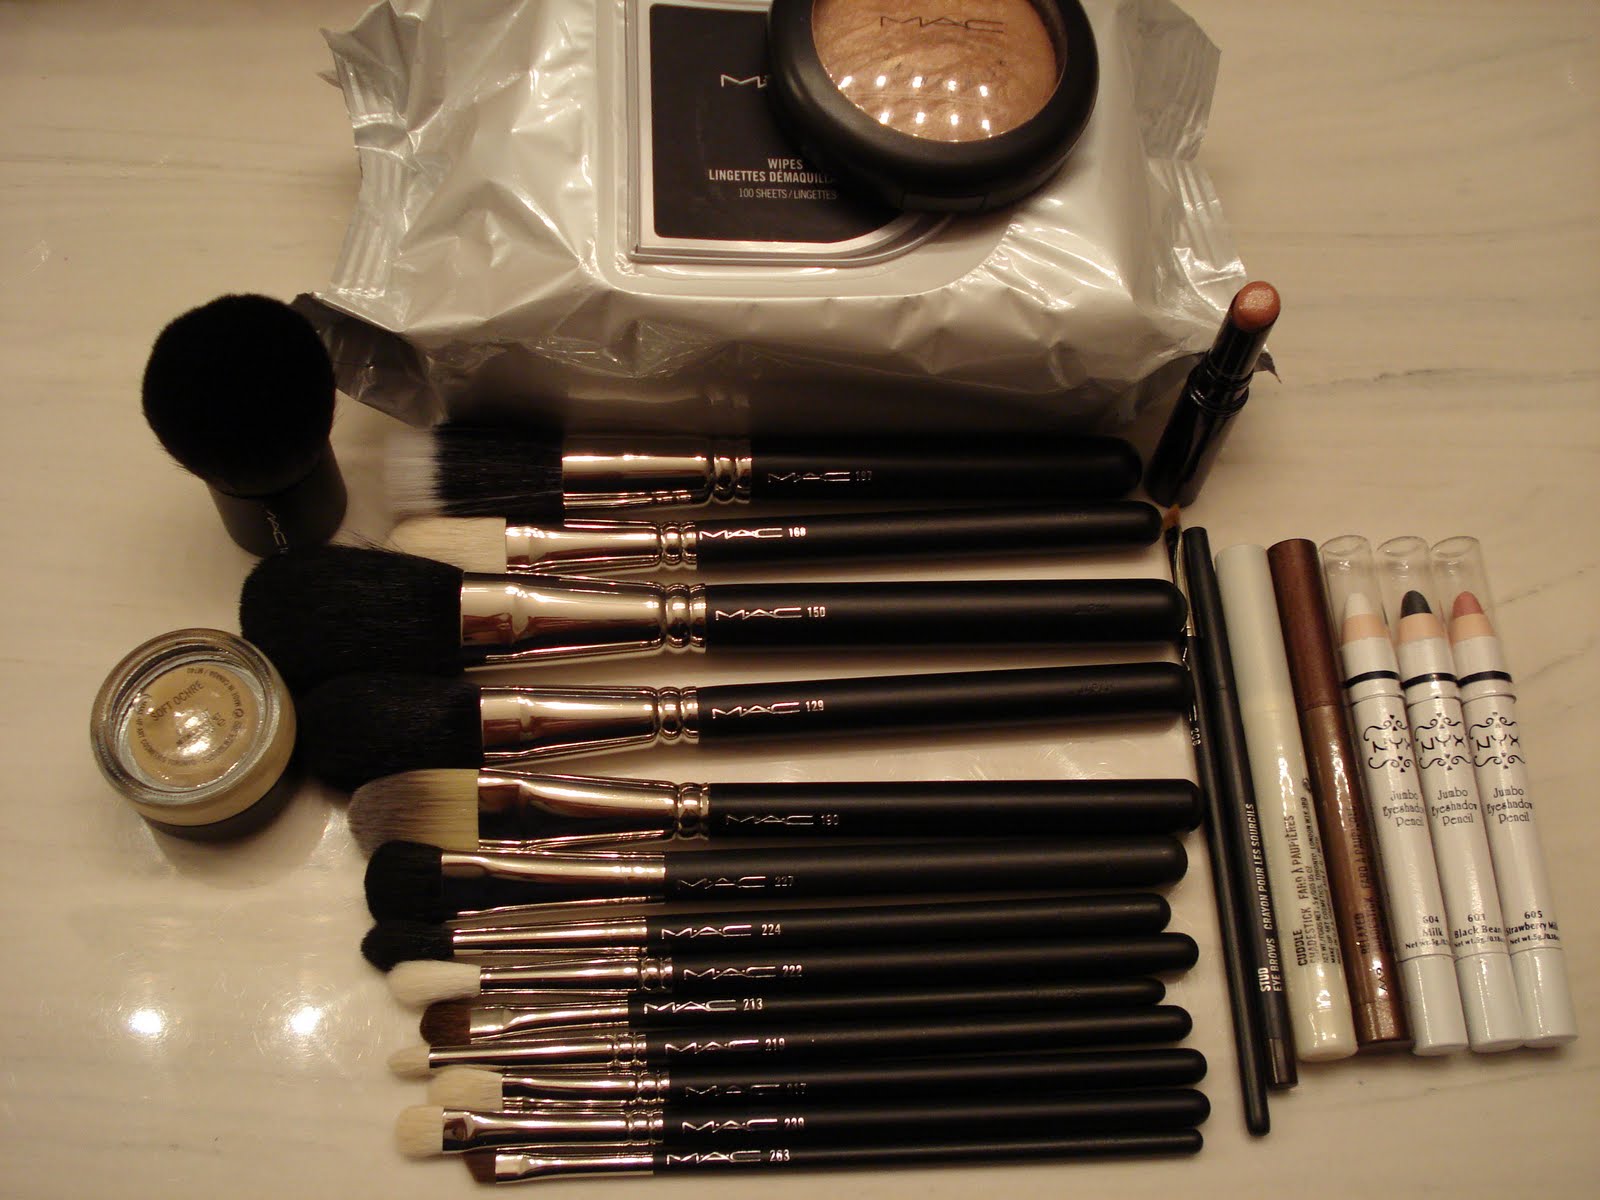
Again, sorry I've been gone so long.  But during this time period, I have done a little shopping here and there.  So excited to try everything.  So far, I have tried out MAC's Slimshine Lipstick in Bare and I love it!  It's a nude color, but not so nude that it pales your face.  Below is the picture and a complete list of things I've bought (in no particular order), so if you have any ideas or suggestions, please let me know.


NYX Jumbo Pencil in Strawberry Milk
NYX Jumbo Pencil in Black Bean
NYX Jumbo Pencil in Milk
MAC Bulk Wipes
MAC Slimshine Lipstick in Bare
MAC Paint Pot in Soft Ochre
MAC Mineralize Skinfinish in By Candlelight
MAC Eye Brow Pencil in Stud
MAC Shadestick in Relaxed
MAC Shadestick in Cuddle
MAC 150 Large Powder Brush
MAC 187 Duo Fibre Brush
MAC 129 Powder/Blush Brush
MAC 168 Large Angled Contour Brush
MAC 190 Foundation Brush
MAC 182 Buffer Brush
MAC 227 Large Fluff Brush
MAC 239 Eye Shader Brush
MAC 222 Tapered Blending Brush
MAC 217 Blending Brush
MAC 224 Tapered Blending Brush
MAC 219 Pencil Brush
MAC 213 Fluff Brush
MAC 263 Small Angle Brush
MAC 208 Angled Brow Brush

I think that's it for now.  I'll try to keep you updated as far as how these products are.  For right now, all I can say is that I love MAC's Slimshine Lipstick in Bare, and the brushes seem very soft, far softer than the Coastal Scents ones I had been using before.  But yeah, I'll test them out on my face later.  Thanks for visiting, and I'll try to have a small giveaway soon.

Love,
Geneys  :o)

Monday, March 8, 2010

Grow Out Your Nails

Wow wow wow wow wow wow!  So sorry I've been gone so long!  Lots and lots of things have happened to me!  I got a job, which kind of explains my absence, plus since I live in the Vegas area, I have had many, many visitors.  Sheesh!  It's pandemonium around here!  And my house has gotten messy since my hubby hasn't had time to clean it.  Sigh.  Anyway, here's an update on a recent project of mine...

For as long as I can remember, I have had short, stubby nails.  They just refused to grow past a certain point and I was always too rough with my hands.  This meant my hands looked less feminine, painting my finger nails was no fun, and if I wanted to feel like a woman, I had to rely on acrylics, which, in the long run, is another dead end because well, I am not diva enough to pay for that look every two weeks.  

Anyway, the last couple of times I had acrylics done on my nails (I got them done for my job interview and to impress the girls at work, which I am not going to try to do anymore, hello!), I thought how nice it would be if I could keep the nails that grew out underneath my acrylics.  Well, I carefully and painstakingly ripped off my acrylics (another con to having your diva nails done), and somehow my real nails underneath were relatively intact.  Woot!  I buffed them and filed them down to a squarish roundish shape and painted them pink.  Voila!  Nice nails!  Take a look, not bad, right?


If you are having a difficult time getting your nails to grow more, try out my experiment!  I think you might be pleasantly surprised.  If, for some reason, you break your nails while ripping your acrylics off, just buff and file it to the shape you would like and wait for it to grow some more.  More than likely, after a month of having acrylics on your nails, the quick (the pink part of your nails) will have extended and you will have longer looking nails anyway.  Hope this works out for you!

Love,
Geneys  :o)

Wednesday, January 13, 2010

Makeup-To-Go

Oh man, sorry I haven't posted in sooo long.  I was busy with a crap ton of stuff, and I had people over all the time.  I used to post everyday, now it's been ten days since my last post.  I think I'm going to switch it up so I am going to post every week, not everyday.  The pace seems to be picking up around here, and although I don't have a job yet, I am still finding myself occupied with stuff I have to do. 

Whew, anyway, now that I have a moment to sit down and spend some time with you, let me share with you a handy little makeup product that you can stuff in your makeup bag or purse, and it will eliminate the need to pack other items.  It's by Too Faced, and it's called the "Glamour To Go Pocket Palette."  This thing is no bigger than the size of a playing card, and yet it contains almost everything you need to do up your face (except your foundation, concealer, mascara and eyeliner, etc.). 

The tiny palette contains a blush, eight eye shadows, and four lip glosses, so you won't have to carry these types of items separately, and the color choices are very nice.  The colors in my palette are not too garish, and they match my brown eye color very well.  The top flips open to reveal the eye shadows, and there is a bottom compartment that slides out for the blush and lip glosses.  If you are having trouble dealing with a makeup bag or purse that is overflowing with stuff, I think this little palette will be a great help. 

For some reason, I can't seem to find my palette on www.Sephora.com, but I did buy it from the website not too long ago for $19.50.  Right now, they are selling the Glamour to Go 2, which contains colors different from the original one I have.  But if you like the colors you see online, get it!  It has been a great help so far, and I can't wait to try out more color combinations.  The item I have is shown below.  Good luck!


Love,
Geneys  :o)

Sunday, January 3, 2010

Mini Makeup Palette

Hey Everybody!  Man, that was an awesome break!

I think it was one of the best Christmases in a long while.  My hubby and I set up this game, where everyone had to find an ornament with their name on it somewhere downstairs, and whoever found the pickle ornament won a prize.  I know, it's a different kind of tradition, but one I learned from Aunt Gynnene on my hubby's side of the family.  It's really fun.  People were looking through our cabinets, in our Christmas tree, behind the sofa...  Give it a try sometime.

Another thing that I did to prepare for Christmas was to make Enkore's mini makeup palette.  In case you haven't heard of his channel, I have attached videos at the very bottom.  It was a little bit difficult to make because there was a lot of measuring to do, plus I had to melt all those lipsticks!  But if you are an arts and crafts person, I think you will love this project.  And you can replace the lipsticks with eye shadows and pigments and such.  Below are a couple of pictures of the one I made for my sister.


Let me teach you from my mistakes, though: first, try not to overfill the metal pans full of lipstick.  If you do, the lipstick will rub off on the cardstock (as shown above) and you won't be able to write your message very neatly.  Second, try not to melt the lipstick for too long.  Seriously, the lipstick WILL change color, and you will basically have to throw away all that hard work!  Lastly, try to buy magnets that are strong.  The magnets I got were from Michael's, and they kept coming apart because the attraction between them was weak.

If you are interested in giving this project a shot, please check out Koren's tutorials.  They are posted below.  Let me know how you like it!


Love,
Geneys  :o)

Saturday, December 19, 2009

Taking a Break...

Hey Guys and Gals,

I will be taking a break until the 3rd of January.  Yes, I have tons of prepping and decorating to do, none of which I have started yet.  Sigh, the life of the procrastinator is never easy.  I will miss you guys and your comments, though, and until I get back into the groove of posting every day, I hope your holidays are filled with laughter and love.  I am checking out now, so Happy Holidays to you and yours!

Love,
Geneys  :o)

Friday, December 18, 2009

Sephora's Makeup Eraser

It's pretty awesome, this thing.  No wonder why it was sold out from www.Sephora.com for the longest time!  When I got to purchase it I was so excited because it would help me solve a lot of problems!

You don't understand, this is like a godsend because as a beginner with makeup, my hands are a little shaky when applying eyeliner, and my eyelids tend to flutter because they're not used to having makeup applied to them.  So then when my eyeliner looks all messed up, I would have to grab a q-tip, soak it with makeup remover, and somehow, carefully get rid of just the messed up parts.  Gosh, not so fun.

But with Sephora's Makeup Eraser, I don't really have to worry.  Its tip comes to a fine point, so if I make a small mistake, it's perfect for erasing just that tiny error.  Also, the tip remains soaked with the makeup erasing formula, so you just have to pop off the cap and apply.  Another positive to this item is that it was only $12.00, which seemed very reasonable to me.

I think this could be a handy tool for even the more experienced makeup artists: there's always occasion to erase just that little bit of makeup, whether it's a mascara smudge or lip liner mistake.  And it's perfect for your makeup bag.  It's just a little pen and it's great for when you need to touch up your makeup.  If it's still in stock, give it a shot!


Love,
Geneys  :o)

Thursday, December 17, 2009

How to Sleep So You Don't Get Wrinkles

I know, it's a weird title, but to a certain extent, sometimes you are a little bit conscious while you sleep, like when you come out of your REM cycles to change sleep positions.  This is when it's crucial to make sure you're not sleeping on your face.  Sleeping on your face makes it so your face skin won't get any air, and it also stops the circulation of blood into that area.  This is bad, and you will definitely get wrinkles faster.

Instead, try to lie on your back.  If you have to change positions and lie on your side, keep most of the weight of your head on your ear.  I don't have any wrinkles for now (knock on wood) and I have been sleeping this way all my life--not necessarily because I was afraid of wrinkles, but for some reason I never felt comfortable sleeping on my face.  Maybe it was because I thought there was a monster in my closet, or maybe it was because I was always scared of Chucky.  LOL, for the LONGEST time I was afraid of Chucky.

Anyway, something you might find helpful is if you change your pillow.  Most people I know use regular pillows, you know, the fluffy ones with regular pillow shapes.  But the problem with regular pillows is that they tend to elevate your head so that your blood has a harder time getting to your face. Instead, I would highly suggest an ergonomic pillow.  Here is a link to an example of an ergonomic pillow: http://www.amazon.com/Econo-Wave-Pillow-Orthopedic-Ergonomic/dp/B002TN9M78.  I got mine from Costco, for I believe around $40.00.

Just try it out, I think you will find these pillows to be very comfortable for your neck and shoulders, and also, it will help you sleep so that you won't have to put pressure on your face.  Good luck not getting wrinkles!

Love,
Geneys  :o)

Wednesday, December 16, 2009

Baroque Boudoir Review

In my haul, you can see basically I bought everything in the Baroque Boudoir Collection from MAC, except for the Prive lipstick.  There is nothing I hate more than tacky, opaque, pink lipstick, and so I avoided that purchase altogether.  I didn't even really give the color a chance, I'll admit, but honestly, I have tried pink lipsticks, only to find out that my skin tone will not allow it!  All of the stuff was available online at www.MacCosmetics.com a couple of weeks ago, but the Treasured lipstick I had to order off of Ebay because it was already sold out.  Actually, the last time I checked, all of the lipsticks and lip glosses were sold out.

Well, let me review the items I have: the Sheer Mystery Powder in Medium Plus is pretty good, but I wouldn't use it to take care of all of the coverage needed for my face.  It is a nice way to blot your nose and such (the packaging is just gorgeous, who wouldn't love pulling an item like that out of their purse??), but let me warn you, the amount of powder you get is pretty small in comparison with MAC's other pressed powders.  I would say that the diameter of the powder pan is about an inch and a half.  However, you receive a back-up powder pan, so it kind of makes up for the size, and I say KIND OF because the cost of this baby was $60.00.

You must think I'm crazy for spending this kind of money, but the thing is that after you have gone through all of your powder, you can keep using the compact by refilling with MAC's blush pans.  And trust me, just the look of this compact is worth it!  I just love the design!  It's feminine and bold and sexy and lacey.

Moving on, I got two of the three lipsticks.  Treasured is an okay nude, but I think it might still be too opaque for me.  In the future I will probably have to wear it on top of my chapstick to try and blend it with my natural lip color.  The Baroque Boudoir lipstick, on the other hand, is just my kind of color.  It's kind of a berry reddish dark pink, but I think it is the perfect shade for my skin tone, which is NC30.  Again, the packaging is extraordinary, so I was more than willing to dish out the $22.00 for each. 

As for the lip glosses, they are just marvelous!  They are just lip glosses, though.  I would say they're more like MAC's Lustreglasses rather than MAC's Dazzleglasses.  So if you are looking for lots of sparkle, I don't think these lip glosses will be enough for you.  But I will say that the sheen to these lip glosses is just so beautiful!  And the lightest pink lip gloss, Preciousness, is very complimentary to my makeup.  Because it is a lip gloss it is not opaque at all.  It's just really pretty.  The Lap of Luxury lip gloss is more of a nude pink, and the D'Nouveau lip gloss is the perfect match for the Baroque Boudoir lipstick, color wise.  These are also $22.00, a great bargain.

They are shown below, in this order: Sheer Mystery Powder, Treasured Lipstick, Baroque Boudoir Lipstick, The Lap of Luxury Lip Gloss, Preciousness Lip Gloss, and D'Nouveau Lip Gloss.


I hope this helps!  And if you can't get your hands on these at your nearest MAC counter, I would suggest Ebay, although the sellers tend to charge you an arm and a leg nowadays.

Love,
Geneys  :o)

Tuesday, December 15, 2009

Tarte's Cloud 9 - FAIL


Oh man oh man oh man oh man.  This product was definitely a huge disappointment.  My first cheek stain ever, and it sucked so bad.  I was so excited to try it out, and when I actually did, I was so sad.  In my opinion, there are several reasons why Tarte's Cloud 9 Cheek Stain failed.

First, the color didn't show up on my NC30 cheeks.  There was absolutely no difference.  I tried to check myself out under different types of lighting, only to find out that the product looked like it just wasn't there.  Perhaps if a very fair skinned person tried it out they might have better luck, but as for me, I guess I was too dark.

Second, the consistency of the product was a bummer.  It felt like I was rubbing wax onto my cheeks.  Bleh!  And once I had finished application of the product, my cheeks were screaming for air.  If you have oily or acne-prone skin, this product is not for you!  I could definitely tell this stuff was blocking my pores.

Third, there is no smell!  It is advertised as having some kind of grape smell, but honestly, I tried to sniff it a zillion times and I still couldn't discern a scent.  I was very disappointed with this aspect of the product, because I had been hopeful that since it was purple, it would have a nice smell.  At least give me a little bit of a berry smell, come on! 

Fourth, Tarte's Cloud 9 is not very easy to use.  The way you get more product to come up out of the tube is if you push up from the bottom, and once the product has come out, there is no way to push it back down.  It would have been nice if it was like chap stick, where you could twist the product so the stuff goes back down the tube, but no.  With my luck, I accidentally pushed too much product up and I couldn't stuff it back down.  Plus, in trying to do so I damaged the product that was sticking out of the tube.

So all in all, Tarte's Cloud 9 was a FAIL.  I would have to describe it as such: it's like a big purple glue stick that applies no color, has no scent, is very sticky and gooey, and you don't want this stuff on your face skin.  If you did get some of this gunk on your face, you would probably want to wash it off right away, which is exactly what I did as soon as I tried it out.

Don't waste your money, avoid Tarte's Cloud 9.

Love,
Geneys  :o)

Monday, December 14, 2009

A Small Collective Haul

Sorry today's post is a little late.  I had to visit the doctor again, only to find out that she still doesn't know what's wrong with me, and I will have to have a biopsy done on my liver.  Bleh!

Anyway, I did some online shopping with my allowance for this month, plus my hubby got some stuff for me for Christmas, so this is a collective haul.  And yes, I watched our budget.  It is very important that I not overspend, especially nowadays, since it's Christmas time and we still have Christmas shopping to do!

The places I visited were: the drug store, www.Clinique.com, www.Sephora.com, and www.MacCosmetics.com to get these items.  Sigh, I think I will have to stop shopping for a while after this, I am having trouble finding places to put all of these things.  I have seen a million videos on how people organize their makeup, but I never found any of their strategies attractive. 

Anyway, here is a picture of the items, and below this is a list of the stuff.  It might look like a lot, but remember, some of this came free with the purchases I made.  I will probably have to do a review of these things soon.


Clinique 3-Step Skin Care System (Holiday Edition)
Clinique 3-Step Skin Care System Travel Size (Free with Purchase)
Clinique Silver Carrying Case (Free with Purchase)
Clinique Silver Tote (Free with Purchase)
MAC Carbon Eye Shadow Palette Refill
MAC Black Tied Eye Shadow Palette Refill
MAC Prep & Prime Transparent Finishing Powder
MAC Paint in Bamboom (I had to get a back-up one!)
MAC Travel Jars (Comes with 4)
MAC Studio Sculpt Concealer in NC30
MAC Powder Blush in Springsheen
MAC Fluidline Eye Liner Gel in Blacktrack
MAC Zoom Lash Mascara Sample (Free with Purchase)
MAC Baroque Boudoir Lap of Luxury Lip Gloss
MAC Baroque Boudoir Preciousness Lip Gloss
MAC Baroque Boudoir D'nouveau Lip Gloss
MAC Baroque Boudoir Baroque Boudoir Lipstick (Treasured is coming in the mail--I can't believe it sold out so fast online!)
MAC Baroque Boudoir Sheer Mystery Powder in Medium Plus
Sephora Makeup Eraser Pen
Tarte Cloud 9 Cheek Stain (Free deluxe sample from www.Sephora.com)
Pond's Wet Cleansing Towelettes

If you guys already have some of these things, please let me know what you think of them!  I am excited to be able to start using these.  Reviews soon to follow!

Love,
Geneys  :o)

Saturday, December 12, 2009

50's Beauty Part IV

50's fashion is a huge topic.  Byrta Carson gives instructions on how to choose and dye your own material, how to choose your colors so the outfit is most flatting, how to sew your own clothes, how to shop for clothes, it's crazy how much stuff she covers.  I could spend all day talking about all the different aspects to 50's fashion, but I will try to narrow it down for the purposes of this post.

I will discuss Carson's seven basic categories of clothes: undergarments, active sport clothes, school clothes, casual clothes, dressy clothes, lounging and sleeping clothes, and traveling clothes.  First let me say it is important to wear the right clothes for the right occasion: for example, a tennis dress is the most appropriate for playing tennis.  Also, it is important that you coordinate your clothes with your natural beauty so that the whole picture can be the most pleasing to the eye.

Undergarments: Tailored undergarments are best, as everyone's body is differently shaped.  And this way, there are no rolls or bumps created on your body.  Underwear should fit smoothly, and bras should be "firm but not tight." (pg. 118)  Slips should cover the bra, and the bottom of the slip should be about half an inch from the bottom of your dress.

Active Sport Clothes: Sport clothes should be looser than your regular clothes so you can move around, and know what the rest of the women might dress like so you can fit in.  There are specific clothes for events such as swimming (swimsuit), tennis (tennis dress), and picnicking (blue jeans or a playsuit), but over all, your clothes should be more comfortable.

School Clothes: The material for your school clothes should be durable and easy to clean.  You want to go for a simple look.  "Most girls wear skirts with sweaters and blouses because they can be interchanged so easily." (pg. 124)  Jewelry should be minimal and shoes should be comfortable.

Casual Clothes: Casual clothes are those that are considered just a little more dressy than school clothes, but not as dressy as dressy clothes.  It's a very vague definition.

Dressy Clothes: Dressy clothes are for "parties, church affairs, dances, or speical evening dates." (pg. 127)  You will want to add ruffles, flares, lace, nice buttons and better materials to these clothes.  Also, there should be matching jewelry and the heels of your shoes should be a little higher than what you might consider school clothes or casual clothes.

Lounging and Sleeping Clothes: A tailored bathrobe is appropriate, or a housecoat is most preferred by women because they can be worn during cleaning or for lounging (in my understanding, a housecoat is like a robe but you can wear it around the house).  Pajamas should be comfortable and there should be room to move around in them.  Leather bedroom slippers are best and should go well with most of your lounging and sleeping clothes.  Mules would be a fine choice for this.

Travel Clothes: When packing for travel, you want to pack clothes that basically have the same color scheme and the whole outfit can change by just switching out a few accessories.  The ideal material for these clothes are ones that don't need pressing.  "A suit, a two-piece dress, a simple dress with a jacket, or the old stand-by, skirts and blouses or sweaters, are all good for traveling." (pg. 131)

Below are some pictures from the book.  I think these will give you a better idea of 50's fashion. (pg. 140-142)


Love,
Geneys  :o)

Carson, Byrta.  How You Look and Dress, 3rd Edition.  St. Louis: Webster Division, McGraw-Hill Book Company, 1955.

Friday, December 11, 2009

50's Beauty Part III

"Hey Sandra, wanna go out Friday night?"
"No."
"Why not??"
"I can't.  I'm washing my hair."

Although it may seem strange to us today that Sandra is turning down this date because she's going to be washing her hair, during the 50's, this was a popular excuse because washing hair was a major endeavor.  Hair was so important that women were willing to do back-breaking work for it.  Here is the process: (pg. 19-20)

1.  Remove your dress and pin a bath towel securely around your neck.
2.  Comb and brush your hair thoroughly.
3.  Massage your entire scalp with your finger tips or the palms of your hands.
4.  Wet your hair thoroughly, using your hands to wet the back of your head.
5.  Apply a small amount of shampoo on different places of your scalp.  Work it into a good lather with your finger tips.  Rub the ends of your hair between the palms of your hands.
6.  Rinse your hair, not forgetting the hair on the back of your head, the hairline all the way around, and the hair behind your ears.
7.  Apply shampoo again in the same manner.
8.  Rinse your hair thoroughly several times, using plenty of warm water each time.  The last rinse may be a little cooler than others.  To make sure your hair is clean, check whether it squeaks when you pull your fingers through it.
9.  Apply a little rinse if desired.  The juice of one lemon or three tablespoons of vinegar to one basin of water helps to remove any soap left in the hair.  Rinse your hair again with plenty of warm water or cool, clean water.
10.  Dry your hair as much as possible by rubbing with a clean towel.
11.  Comb your hair and then arrage and set it in a becoming style.

Whew!  That's how women during the 50's took care of their hair.  And on a side note, it was considered improper to brush your hair in public.  There were also tips and tricks to styling hair so that a round face could appear less so, a wide face could be made narrower, and so on and so on.  The book didn't give instructions on how to style your hair a particular way, but below is a picture with examples of some of the tips and tricks. (pg. 22-23)


I hope this sheds some light on hair during the 50's, man, was it complicated!  I just like to take a quick shower, put my hair back in a pony tail and be done with it.  When my hubby and I were dating, I put hardly any effort into my hair.  Poor Sandra!

Love,
Geneys  :o)

Carson, Byrta.  How You Look and Dress, 3rd Edition.  St. Louis: Webster Division, McGraw-Hill Book Company, 1955.

Thursday, December 10, 2009

50's Beauty Part II

The general rule for makeup during the 50's was to use just enough makeup to look natural.  How do you know how much makeup to apply?  Well, this is determined by the color of your cheeks.  Carson, the author of the book, believes that if you have enough coloring to your face, you really don't need very much makeup.

Powder: The purpose of powder is "to protect the skin as well as to make it look soft and smooth." (pg. 24)  The way in which this look would be achieved would be as follows: put a makeup cape around your shoulders, use a powder puff to apply lots of powder on your face, brush off the excess powder, and brush your eyebrows and eyelashes so they do not have powder on them.

Rouge (Blush): If you have enough color in your cheeks, you really don't need rouge.  But if you do go for rouge, the lighter skin tones require lighter colors, and the darker skin tones require darker colors.  To determine your rouge color, she says to try pinching your cheeks.  Again, the point of rouge, as with the powder, is to make you appear as natural as possible.  This is why the rouge should be faded out and look seamless with the rest of your skin.

Lipstick: Lipstick follows suit--going for the natural look.  You want to try and find a color that BLENDS with the natural color of your lips.  Also, you want to try and match your lipstick color to your rouge color.  I once saw Michelle Phan use her lipstick as her blush, and I think this might be a good technique for color coordination.  Below is a page out of the book, which shows you in detail how to apply lipstick. (pg. 27)  I hope you can read the instructions!


Eye Shadow: There is nothing about eye shadow in this book, so my guess would have to be that during the 50's women did not really make their eyes the focus.  The natural look they were going for was one of freshness and cleanliness, and this would require that they kept their eyes clear of makeup.

I hope this helps!  I know the makeup during this time was rather simple, but I think that because it was so minimal, it was also classic and beautiful.  The point is to accentuate what you already have.  I believe we could all learn from this era today, by appreciating more what was naturally bestowed upon us, how our natural beauty is unique to each person.  

Love,
Geneys  :o)

Carson, Byrta.  How You Look and Dress, 3rd Edition.  St. Louis: Webster Division, McGraw-Hill Book Company, 1955.

Wednesday, December 9, 2009

50's Beauty Part I

When I first bought this book from a church rummage sale many, many years ago, I didn't know how helpful and interesting it would be now.  Many makeup tutorials I have come across teach you how to look like the pin-up girl of this era, which I can appreciate this kind of beauty, but there is not much information on what regular women did during the 50's.  Well, this is where this book comes in handy.  It is called "How You Look and Dress," by Byrta Carson, and I will be sure to note the whole bibliography at the bottom.

I plan to show you many of the things I learned from this book, so that you can try following the guidelines of this book.  Today's post is just Part I, a sort of introduction to the series, because there are many components to defining beauty way back then, and there's no way I can cover it all at once.  Basically, the look that most girls were after during that time was clean and fresh.  In other words, it should be refreshing to look at a woman who took good care of herself down to the last detail: "Everything about me is fresh and clean--my body, my teeth, my hands, my clothes, and all?" (pg. 28)

Just take a look at the girl on the cover below.  Doesn't everything about her say to you she is spic-and-span?  From her head down to her feet she has thoroughly groomed herself.  There is nothing shabby or drab about her, and yes, in a way it is refreshing to look at her.  Her clothes are crisp and well-pressed, her skin is radiant, her hair is styled with care, her shoes and headband match her outfit.  It's all about simplicity, clean lines, sharp creases, and actually, I am compelled to call her style of beauty classic.


This book is very interesting, and in the next few posts I hope to be able to share with you some helpful facts and tips to pulling off this classic beauty look.  I'm so excited, visit again tomorrow, there is so much more in store!

Love,
Geneys  :o)

Carson, Byrta.  How You Look and Dress, 3rd Edition.  St. Louis: Webster Division, McGraw-Hill Book Company, 1955.

Tuesday, December 8, 2009

Removing Eye Makeup

For many of you, removing eye makeup is just another part of your everyday routine.  But this step is actually very important.  Any time you apply eyeliner, mascara or eye shadow to your eyes, you are bombarding your eyeballs with chemicals that may be irritating.

This is why the recent development of "lining the waterline" is confusing to me.  That is as close to your eyeball as you could possibly get.  Actually, it's TOUCHING your eyeballs, and people from all over are always trying to find a brand that doesn't bother their eyeballs.  Hello!  It's bothering your eyeballs because it doesn't belong there to begin with!  Sheezaloo! 

OK.  I will get off my soap box now, I just had to get that one out of my system!  But back to removing your eye makeup: when you remove your eye makeup it is important to do so very gently.  If you scrape or stretch out your eyelids and the skin surrounding your eyes, you will get wrinkles much faster, and we don't want that.  This means that you must be very picky about the chemicals and the type of swabs you use to remove your eye makeup.

A person I know, and I won't mention any names, started to use ProActiv toner to remove her eye makeup and I screamed at her: "OMG, what are you DOING??  STOP IT!"  I quickly handed her my own eye makeup remover, relieved to have avoided an emergency call to the local poison control center.  People, please do not use anything that was not intended for your eyes on your eyes!

Instead, let me give you a couple of tips: in my experience, the oil-based eye makeup removers are the gentlest on your eyes.  The formula is smoother, and the application is the gentlest on your skin.  Just be sure to shake the bottle before use, because the oil tends to separate from the rest of the liquid.  The one I'm finishing up right now is by Shiseido, shown below.


Also, please use cotton balls rather than cotton pads.  Cotton pads tend to scrape the skin around your eyes, and the feeling is rather harsh.  It may get the makeup off faster, but trust me, it is not helpful with wrinkles.  In the picture, take a look at the paper-y grooves in between the fluffy parts of the cotton pad: these are the culprit and they are not your friends.  Cotton balls are ALL fluff, and in my opinion they are the gentlest on your eyes.  If you need proof, try testing both out.  

I hope this helps, and please keep those toners away from your eyes!

Love,
Geneys  :o)